LED Cube/Using the Cube: Unterschied zwischen den Versionen
Marvin (Diskussion | Beiträge) (Die Seite wurde neu angelegt: „{{LED Cube Series/en}}“) |
Marvin (Diskussion | Beiträge) |
||
| (14 dazwischenliegende Versionen desselben Benutzers werden nicht angezeigt) | |||
| Zeile 1: | Zeile 1: | ||
{{LED Cube Series/en}} | {{LED Cube Series/en}} | ||
Now we will learn to use the cube. But, first of all some theory. | |||
==LED Cube Operation== | |||
When powering up the LED Cube, it can be in one of two modi: | |||
* '''Bootloader Mode''': In the bootloader mode, the LED Cube will enumerate at the USB Host it is connected to. You are then able to transfer a new application to the LED Cube. | |||
* '''Application Mode''': In this case, the application that has been loaded last time when the LED Cube was in the bootloader mode will start. | |||
The mode the LED cube will start in is set by the bootloader jumper. When it is on the left side, the LED Cube will be in the bootloader mode after startup. | |||
<gallery perrow=2 widths=300 heights=200> | |||
File:Lcpcb-10-02.jpg|the bootloader jumper in bootloader mode | |||
</gallery> | |||
If, on the other hand, it is on the right two pins or completely removed, The LED Cube will enter the application mode. | |||
==Creating Your Own Animation== | |||
There are many ways for creating an animation. For now, we will stick to separate frames which will be played in an endless loop. You can use our LED Cube web interface to create your animation: [http://cube6.0x53a.de/ cube6.0x53a.de]. | |||
{{attention|If you do not have IPv6 uplink visiting this site will fail ''always''. You may then also use a proxied version of this web interface at [http://sandroknauss.de/ledcube sandroknauss.de/ledcube]. This proxy is kindly provided by hefee for those of you who are still stuck in an IPv4 age. This version is limited to generating hex files and saving a animations. However, you can not re-load them. If you do want to use the full version of the web interface, get IPv6 uplink. The direct way for this would be to ask your Internet Service Provider. Alternatively you can ask [http://www.sixxs.net/ SiXXS] to provide you with an IPv6 tunnel.}} | |||
Simply use this web interface to click your own animation. Once you have finished one, click on the 'Generate HEX' button. This will generate an application for your LED Cube, playing the animation you just created. Save this hex file on your disk and remember where it was. | |||
==Loading Your Application== | |||
Now we are going to load the application which is contained in the HEX file you just downloaded. To do this, we first need to get the host application to talk to the LED Cube bootloader. This process is different for Windows and Linux: | |||
===Windows=== | |||
{{attention|@todo}} | |||
===Linux=== | |||
You first need some software. In particular: | |||
* make | |||
* gcc | |||
* libusb (including headers) | |||
* git | |||
For example, if you are using Ubuntu, the only thing you need to do is: | |||
sudo apt-get install git git-core libusb-dev | |||
Now we check out the LED Cube git: | |||
git clone http://www.0x53a.de/git/cube-3 | |||
Then enter the directory where the bootloader tool is located. | |||
cd cube-3/bootloader/commandline | |||
And let's build this thing | |||
make | |||
Now, if everything went as expected, you will have a new file in this Folder. Type ls to check if it appeared: | |||
ls | |||
You should see a file named 'bootloadHID'. (You will also see a bootloadHID.exe. This is '''not''' it. This is for the windows people who are unable to build the tool for themselves ;) .) | |||
Now set the bootloader jumper on your cube to bootloader mode (see above if you skipped the previous part) and '''re'''connect it. Then flash the new software onto the cube using the following command: | |||
sudo ./bootloadHID -r '''<path to the hex file you just downloaded>''' | |||
Aktuelle Version vom 7. Mai 2012, 07:03 Uhr
| LED Cube Series | |
|---|---|
|
Chapter 1: Build Section 0: Preparation and Requirements Section 1: PCB Soldering Manual Section 2: Cube Soldering Manual Section 3: Assembly and Testing | |
|
Chapter 2: Play | |
|
Chapter 3: Learn |
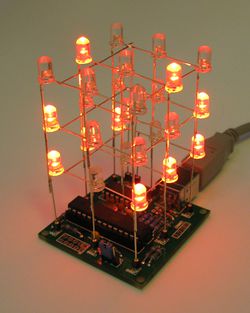
Now we will learn to use the cube. But, first of all some theory.
LED Cube Operation[Bearbeiten]
When powering up the LED Cube, it can be in one of two modi:
- Bootloader Mode: In the bootloader mode, the LED Cube will enumerate at the USB Host it is connected to. You are then able to transfer a new application to the LED Cube.
- Application Mode: In this case, the application that has been loaded last time when the LED Cube was in the bootloader mode will start.
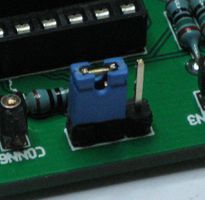
The mode the LED cube will start in is set by the bootloader jumper. When it is on the left side, the LED Cube will be in the bootloader mode after startup.
-
the bootloader jumper in bootloader mode
If, on the other hand, it is on the right two pins or completely removed, The LED Cube will enter the application mode.
Creating Your Own Animation[Bearbeiten]
There are many ways for creating an animation. For now, we will stick to separate frames which will be played in an endless loop. You can use our LED Cube web interface to create your animation: cube6.0x53a.de.
|
If you do not have IPv6 uplink visiting this site will fail always. You may then also use a proxied version of this web interface at sandroknauss.de/ledcube. This proxy is kindly provided by hefee for those of you who are still stuck in an IPv4 age. This version is limited to generating hex files and saving a animations. However, you can not re-load them. If you do want to use the full version of the web interface, get IPv6 uplink. The direct way for this would be to ask your Internet Service Provider. Alternatively you can ask SiXXS to provide you with an IPv6 tunnel. |
Simply use this web interface to click your own animation. Once you have finished one, click on the 'Generate HEX' button. This will generate an application for your LED Cube, playing the animation you just created. Save this hex file on your disk and remember where it was.
Loading Your Application[Bearbeiten]
Now we are going to load the application which is contained in the HEX file you just downloaded. To do this, we first need to get the host application to talk to the LED Cube bootloader. This process is different for Windows and Linux:
Windows[Bearbeiten]
|
@todo |
Linux[Bearbeiten]
You first need some software. In particular:
- make
- gcc
- libusb (including headers)
- git
For example, if you are using Ubuntu, the only thing you need to do is:
sudo apt-get install git git-core libusb-dev
Now we check out the LED Cube git:
git clone http://www.0x53a.de/git/cube-3
Then enter the directory where the bootloader tool is located.
cd cube-3/bootloader/commandline
And let's build this thing
make
Now, if everything went as expected, you will have a new file in this Folder. Type ls to check if it appeared:
ls
You should see a file named 'bootloadHID'. (You will also see a bootloadHID.exe. This is not it. This is for the windows people who are unable to build the tool for themselves ;) .)
Now set the bootloader jumper on your cube to bootloader mode (see above if you skipped the previous part) and reconnect it. Then flash the new software onto the cube using the following command:
sudo ./bootloadHID -r <path to the hex file you just downloaded>

