LED Cube/Using the Cube: Unterschied zwischen den Versionen
Marvin (Diskussion | Beiträge) |
Marvin (Diskussion | Beiträge) |
||
| Zeile 19: | Zeile 19: | ||
Simply use this web interface to click your own animation. Once you have finished one, click on the 'Generate HEX' button. This will generate an application for your LED Cube, playing the animation you just created. Save this hex file on your harddisk and remember where it was. | Simply use this web interface to click your own animation. Once you have finished one, click on the 'Generate HEX' button. This will generate an application for your LED Cube, playing the animation you just created. Save this hex file on your harddisk and remember where it was. | ||
==Loading your Application== | |||
Now we are going to load the application which is contained in the HEX file you just downloaded. To do this, we first need to get the host application to talk to the LED Cube bootloader. This process is different for Windows and Linux: | |||
===Windows=== | |||
{{attention|@todo}} | |||
===Linux=== | |||
You first need some software. In particular: | |||
* make | |||
* gcc | |||
* libusb (including headers) | |||
For example, if you are using Ubuntu, the only thing you need to do is: | |||
sudo apt-get install libusb-dev | |||
Version vom 5. Mai 2012, 21:55 Uhr
| LED Cube Series | |
|---|---|
|
| |
|
Chapter 1: Build Section 0: Preparation and Requirements Section 1: PCB Soldering Manual Section 2: Cube Soldering Manual Section 3: Assembly and Testing | |
|
Chapter 2: Play | |
|
Chapter 3: Learn |

Now we will learn to use the cube. But, first of all some theory.
LED Cube Operation
When powering up the LED Cube, it can be in one of two modi:
- Bootloader Mode: In the bootloader mode, the LED Cube will enumerate at the USB Host it is connected to. You are then able to transfer a new application to the LED Cube.
- Application Mode: In this case, the application that has been loaded last time when the LED Cube was in the bootloader mode will start.
The mode the LED cube will start in is set by the bootloader jumper. When it is on the left side, the LED Cube will be in the bootloader mode after startup.
-
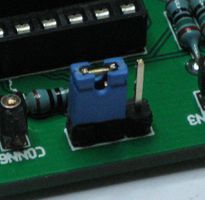
the bootloader jumper in bootloader mode

If, on the other hand, it is on the right two pins or completely removed, The LED Cube will enter the application mode.
Creating Your Own Animation
There are many ways for creating an animation. For now, we will stick to separate frames which will be played in an endless loop. You can use our LED Cube web interface to create your animation: cube6.0x53a.de. If you do not have IPv6 uplink you may also use a proxied version of this web interface at sandroknauss.de/ledcube.
Simply use this web interface to click your own animation. Once you have finished one, click on the 'Generate HEX' button. This will generate an application for your LED Cube, playing the animation you just created. Save this hex file on your harddisk and remember where it was.
Loading your Application
Now we are going to load the application which is contained in the HEX file you just downloaded. To do this, we first need to get the host application to talk to the LED Cube bootloader. This process is different for Windows and Linux:
Windows
|
@todo |
Linux
You first need some software. In particular:
- make
- gcc
- libusb (including headers)
For example, if you are using Ubuntu, the only thing you need to do is:
sudo apt-get install libusb-dev